Weaving Class

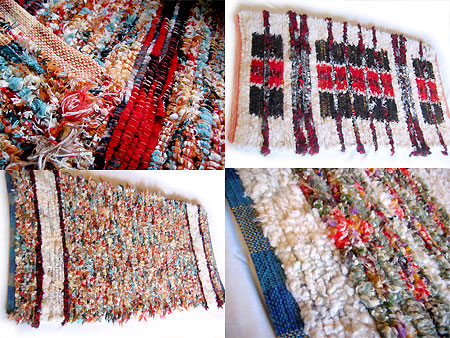
During the Fall term I took a Weaving workshop at the Craft Center. It was a great class – the teacher, JN, managed to transmit a lot of information about weaving in just 5 class sessions, and I found her presentation inspiring and not at all intimidating, even though I had very little previous experience with weaving (remember those little square potholder looms?! that was it.) The class project was a small rug, woven on a table loom, from industrial waste from a wool mill here in Oregon. It was the icing on the cake that we were able to make such a beautiful, functional item from scraps. In raw form, our materials consisted of long strips of cut (and frayed) woven wool. As you can see in the top left image, the rug is very “hairy” right after completion. Then, you give it a whirl in the washer and dryer, and what comes out is a fluffy, “felted” or “napped” rug (seen at lower right.) They’re soft, cozy, especially to bare feet, reversible, machine washable, and durable – JN said “these rugs will outlast us.”
The main thing you learn about weaving once you try it is that it takes a lot of “loom dressing” before the actual weaving begins. You have to figure out how many warp (vertical) threads you need, and then wind & cut those using a special frame or rack. Then you have to thread each warp end through several loom structures and wind the warp onto the back “spool.” This process took up 3 out of our 5 sessions! As JN said, it’s a perfect craft for people (like me) who have excess nervous energy and are just a teensy bit “OCD.” Once I’d invested all that time to carefully threading and counting, it was so exciting to finally start to weave the rug – it goes quickly with such a coarse weft. It only takes 2 or 3 “shots” or rows of that woolly stuff to get an inch of rug.
Once the class was over, I still had access to the looms for the rest of the quarter. JN had a little show-and-tell tea party at her house, and after showing us many of her amazing projects, we picked out more materials from the stash she had leftover from the class (we bought it from her by the pound, just as she had obtained it from the mill.) I decided to make 3 more rugs for Christmas gifts. The top right image is the red-black-white rug I made for SS & NS. They just bought a house really close to my parents, and it has all hardwood floors. The block motif was created by carefully lining up the areas of color that were woven into the raw materials. The lower left image is of the rug I gave to JA & MA. They also just bought a house, and I hope this rug will help keep them cozy in their new home! My mom got the rug shown in the lower right. It’s white with green-multi stripes.

Hi Katie!
I’m so excited that you posted again I love to read your blog. We put Toby on a sheet in the kitchen and then he wanted to go and explore the rug you made. I promptly scooped him up and moved him I didn’t want him to put droppings on it.
Oh and the rugs you made are beautiful by the way!